Fermented peppers easy to make and are fantastic for someone just beginning the fermenting journey.
Sauerkraut. Isn’t that where everyone begins with fermented vegetables? I think it must be as there are many, many sauerkraut articles all over the place
I think one of the reasons sauerkraut is such a great place to begin is because it’s easy and it tastes great. At least I think it tastes great. However, my “vinegar hating” husband doesn’t quite get how wonderful it is. {sigh}

I knew that if I was going to win my family over on this fermenting thing that it was going to be a little at a time and that I’m going to have to start with things they already love. So, in addition to sauerkraut. I ferment peppers.
And guess what? They love them! The fermented peppers don’t have a vinegar taste that pickled peppers do and the fermenting seems to make the pepper a little spicier.
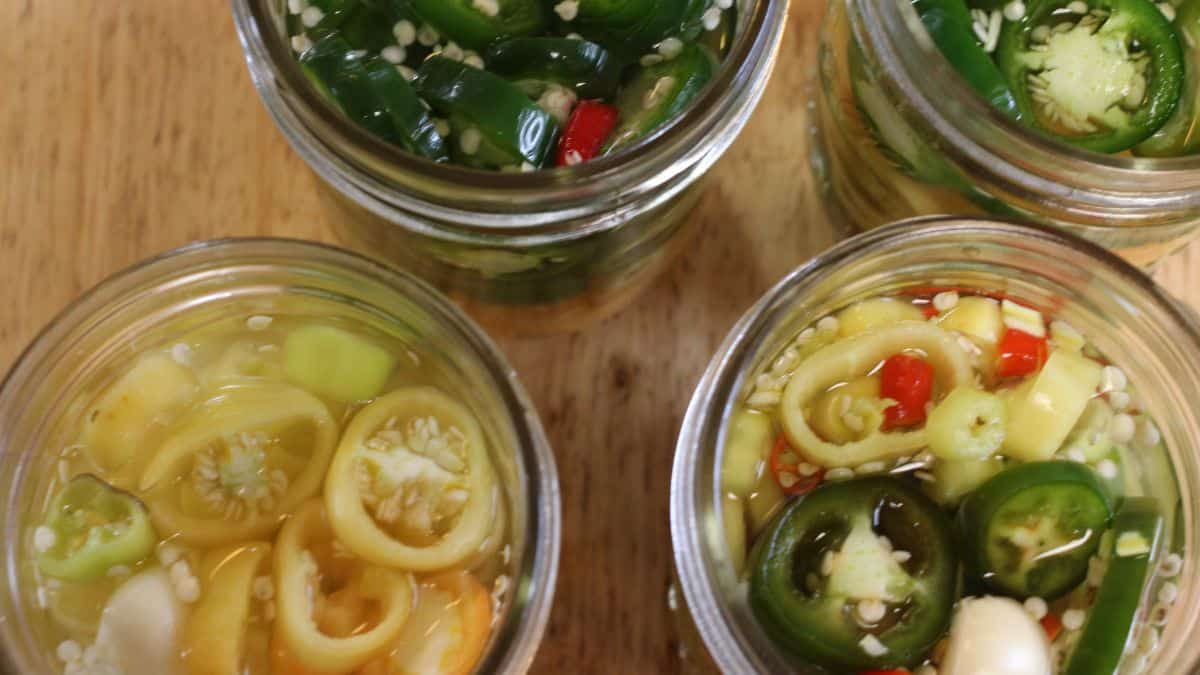
While making sauerkraut is easy, fermenting peppers is super easy. All you need is peppers, salt, water and something to ferment them in. I’m using a wide mouth pint size jar and either Fermentools lids or Easy Fermenter lids.
One thing I really like about mason jars for fermenting is that I can try different ferments in small batches until I find out what my family really likes.

How to Make the Brine
The brine for fermented peppers is simple — just non-iodized salt and non-chlorinated water. The goal is enough salt to keep mold away without stopping the fermentation process.
The easy method: Use 1 tablespoon of non-iodized salt per 1 quart of non-chlorinated water. Stir until the salt dissolves completely. This gives you approximately a 2% brine and works reliably every time. This is what I do.
For more precision: If you want to calculate an exact 2% brine by weight, you’ll need a digital kitchen scale.
- Place your jar on the scale and set it to zero.
- Fill the jar with water and note the weight in grams.
- Multiply that number by 0.02 — that’s how many grams of salt you need.
- Pour the water into a bowl or measuring cup, add the salt, stir to dissolve, and pour back into the jar.
Either method works well. The tablespoon shortcut is what most home fermenters use, and I’ve never had a problem with it. If you want to get precise — especially if you’re experimenting with longer ferments or a large batch — the gram method gives you more control.
One important note on the water: Chlorinated tap water can inhibit fermentation because chlorine kills bacteria — including the good bacteria you’re trying to grow. If your tap water is chlorinated, use filtered water, bottled water, or let tap water sit uncovered for 30 minutes to let the chlorine off-gas before using it.
How to Ferment Banana Peppers
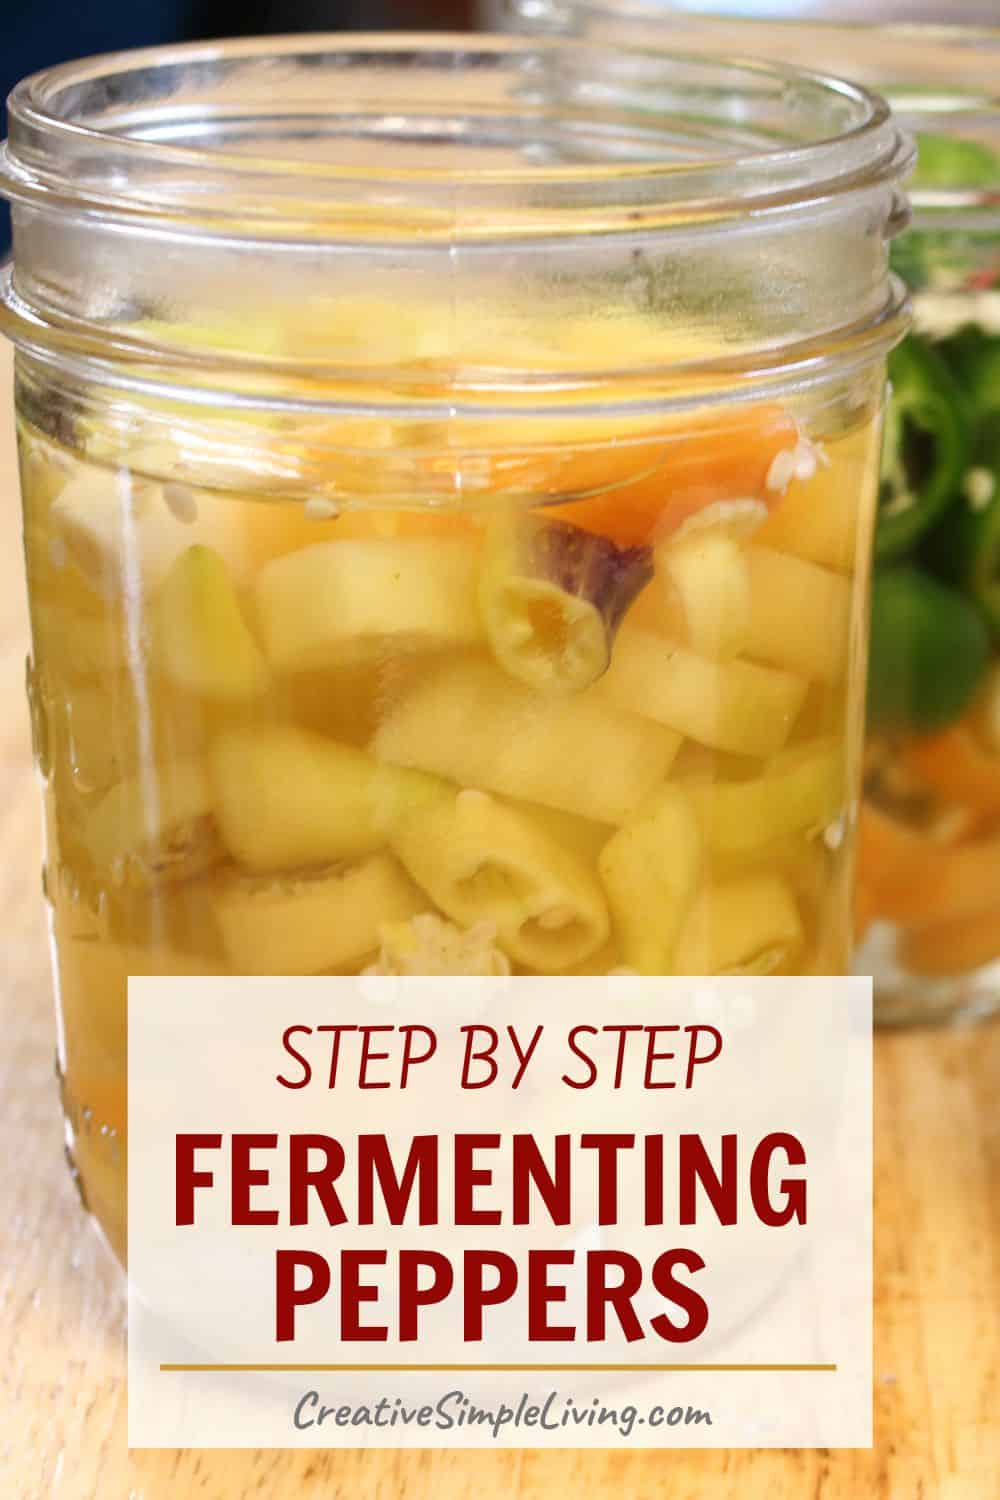
To make fermented peppers prepare the peppers by rising them off and slicing into rings or long slices, the shape doesn’t matter. Also, if you are fermenting small peppers you can just leave them whole if you want.
Put the peppers in your jar and pour the brine over them.
Put a weight on the peppers to keep them under the brine. If any of the seeds float above the weight, just skim them off.
Add the fermentation lid and let the peppers ferment in a cool dark place for 5-10 days.
Check your peppers every day or so. The first few days there should be some bubbles forming and the brine might get cloudy – that’s a good sign. If some brine bubbles over and leaks onto the counter, just wipe it up.
Taste the peppers on day 5 or 6, if they are salty tasting, they need more fermentation time. Put the fermentation lid back on the jar and let them sit for a few more days.
The fermenting process is more of an art than a science and there are many variables that will cause your peppers to ferment in just a couple of days or take up to two weeks.
When the peppers are pleasantly sour, remove the fermenting lid and weight. Replace the fermenting lid with a storage lid and store in the refrigerator.

The process is the same if you are fermenting jalapeno peppers or sweet banana peppers. We like to mix the spicy peppers in a jar, so we usually have jalapeno, poblano, and cayenne peppers all mixed in the same jar.
I don’t care much for hot peppers but I love pickled banana peppers so we ferment the banana peppers all by themselves. We also will usually add a garlic clove or two to the mix.
I have a set of worksheets I print each year to keep track of what I’ve preserved. You can get the worksheets emailed to you by filling out the form below.
Ingredients
Equipment
Method
- Make a brine using 1 Tbsp non-iodized salt and 1 quart non-chlorinated water. Set aside
- Slice peppers (you can cut in rings or lengthwise whatever you like best)
- Remove seeds if you want to (we don't do this but it seems to be a common practice to remove peppers seeds)
- Pack peppers into wide mouth pint size mason jar
- Put the peel garlic cloves into the jar if you are using garlic
- Pour brine over peppers in jar
- Put a glass weight on top of the peppers to submerge them. Try to remove any seeds that float up above the weight
- Add fermenting lid to jar
- Store in a cool, dark place for 5-10 days. Check your peppers every day or so. The fermenting process is more of an art than a science and there are many variables that will cause your peppers to ferment in just a couple of days or take up to two weeks.
- Once the peppers are sufficiently fermented, remove the fermenting lid and weight.
- Cover the jar with a plastic storage lid and store in the refrigerator.
Notes
- Place your jar on the scale and set it to zero.
- Fill the jar with water and note the weight in grams.
- Multiply that number by 0.02 — that’s how many grams of salt you need.
- Pour the water into a bowl or measuring cup, add the salt, stir to dissolve, and pour back into the jar.
Tried this recipe?
Let us know how it was!Frequently Asked Questions
Pickled peppers are preserved in vinegar, which gives them that sharp, tangy taste. Fermented peppers use only salt water and the naturally occurring bacteria on the peppers themselves — no vinegar involved. The result is a tangier, more complex flavor that’s actually milder than vinegar-pickled peppers, and the fermentation process creates beneficial probiotics that are good for gut health. My husband refuses to eat vinegar pickles but loves fermented peppers, which is how I got into fermenting in the first place.
The simple method: use 1 tablespoon of non-iodized salt per 1 quart of non-chlorinated water. This gives you approximately a 2% brine, which is the sweet spot for fermenting peppers — enough salt to inhibit mold but not so much that it stops the fermentation. For more precision, you can weigh your water in grams and multiply by 0.02 to get the exact grams of salt needed.
No, but it helps. A fermentation lid with an airlock lets carbon dioxide escape without letting oxygen in, which reduces the chance of surface mold. If you don’t have one, you can use a regular lid loosely tightened and “burp” the jar daily by opening it briefly to release gas. Many people ferment successfully without specialty equipment — the most important thing is keeping the peppers submerged under the brine.
In the first few days you should see small bubbles forming — that’s the fermentation working. The brine will also start to turn cloudy, which is perfectly normal and a good sign. Occasionally brine bubbles up and overflows the jar — just clean it up and make sure the airlock water is still in place. After about day 5, start tasting a pepper. If it tastes mostly salty, it needs more time. When it tastes pleasantly sour and the flavor is to your liking, it’s done.
Anywhere from 5 to 14 days, depending on your temperature and how tangy you want them. Warmer temperatures speed up fermentation — in a warm kitchen in summer, your peppers might be ready in 5 days. In a cool spot in winter, they might take closer to 2 weeks. Taste them starting around day 5 and let your palate be the guide.
Yes — the process is identical regardless of pepper variety. We regularly mix jalapeños, poblanos, and cayennes in the same jar. Banana peppers I tend to ferment by themselves since I love them and eat them straight from the jar. You can ferment peppers whole (with a slit cut in them to let the brine penetrate), in rings, or in strips — whatever shape you prefer.
Don’t panic — this is a harmless reaction called anthocyanin color change. The pigments in garlic react with trace minerals in the salt or water and turn blue-green. It looks alarming but has no effect on flavor or safety. It usually fades once the peppers go into cold storage.
Once the peppers have fermented to your liking, swap the fermentation lid for a regular storage lid and move them to the refrigerator. The cold slows fermentation to almost nothing. They’ll keep in the fridge for up to a year, though in our house they rarely last that long.
No — iodized salt can inhibit fermentation because iodine kills bacteria, including the beneficial bacteria that drive the fermentation process. (Although there are some studies that now show the iodine is too low to inhibit fermentation.) However, it can sometimes cause a metallic flavor in ferments. More of a concern is the anti-caking agents in the iodized salts. Use non-iodized salt: canning salt, fine sea salt, kosher salt, or Himalayan salt all work well. Just check the label to make sure salt is the only ingredient.
If you love fermented vegetables be sure to try our fermented dill pickles and rainbow kraut. We also have some tips for the beginner fermenter.
The Herbal Academy also has a fantastic fermentation course available. You can learn how to make mead, herbal beer and wine, water kefir, and fermented foods.

The Ultimate Guide to Preserving Vegetables
If you you’re looking for more preserving inspiration, I know you’ll love The Ultimate Guide to Preserving Vegetables. In this book I share how to can, dehydrate, freeze and ferment almost every vegetable. I also share 100 favorite recipes for preserving the vegetables in fun way that will save you time and money later. Get your copy here.
What have you been fermenting lately?

Angi Schneider is the author of The Ultimate Guide to Preserving Vegetables and Pressure Canning for Beginners and Beyond, both published by Page Street Publishing. She has taught canning classes for 177 Milk Street, been featured in Serious Eats, and written for Countryside Magazine. Angi has been sharing gardening, preserving, and simple living skills since 2010.
Yummy! Are they the same flavor as processed jalapenos?
And what have your favorites been?
The flavor is the same as a fresh jalapeno, only a little spicier. They also retain their crunch, which doesn’t happen when you can them in vinegar. My favorite pepper is the banana pepper. I can eat those straight out of the jar. 😉
@Angi Schneider, so funny I come looking for a fermented pepper recipe 9 years later and stumble on this post! Wow! I have been following you for some time. I am having a decent pepper year and we LOVE banana peppers. I thought five plants was enough, but they aren’t. So I am throwing in Jimmy Nardelo and some other snacking type pepper. BTW, I have your canning books and love them. But, my “getting older” eyes can’t handle the small font in the index. So tiny!!
Time has flown by! I’m so glad your peppers are doing so well. And yeah, the index print is small for old eyes…lol.
What’s the difference between canning and fermenting vegetables? Are all fermented vegetables vinegar-y tasting?
Canning is when you either use a pressure canner or water bath canner to preserve foods that are self stables and will last at least a year in the pantry. Many times large amounts of sugar or vinegar are used to help preserve the produce (esp. if you are using a water bath canner). Fermenting doesn’t use vinegar at all, so the flavor is not vinegar-y. Fermenting uses salt, water (or the liquid from the produce) and the naturally occurring microbes on the produce to preserve it. Fermented foods are not shelf stable and will need to be stored in the refrigerator, they can be kept for 6-12 months most of the time. Fermented foods are able to be canned in a pressure canner or water bath canner depending on the acidity level but then you destroy all the good enzymes and bacteria that you just grew.
I don’t understand how to make the 2% brine.
Hi Alice, You’ll need to weigh your water and your salt in grams (not ounces). If you have 400 grams of water which is about a pint of water, you will need 8 grams of salt to make a 2% brine. Hope this helps.
Place the jar on a weighing scale. Set the scale to zero. Place veg and then unsalted water into jar. Tap the weight of total contents into a calculator. Now times by 0.02 (I Usually do 0.025). Now tip the water into a jug. Place this onto the scales and set to zero. Add the salt in grams that you just calculated. Put water back in jar with veg.
John – this is incorrect. The brine (water) needs to be 2% salted. You’re adding the weight of the vegetables (peppers) into the equation, and on top of that you’re adding another 1/2 % (.025). Your brine is actually much higher than the article recommended 2% and may interfere with the fermentation process
Actually either way is fine and within the range for fermenting peppers. Of all the preservation methods, fermentation is both a science and an art.
Yum! My boyfriend HATES vinegar and it drives me crazy! Will definitely be trying this!
http://www.chronically-healthy.com
Isn’t that crazy. My husband has brainwashed most of my children into hating pickles. I should have worked harder when they were little ;-). Hope you enjoy them!
Is there a reason you use the plastic storage lids instead of the metal ones? I have been using the metal lids with bands for my ferments
You can certainly use the metal lids and bands for ferments, just make sure there’s plenty of room in the jar and the ferment doesn’t touch the lid. Over time the ferment can actually break down the metal so you don’t want it in constant contact. Because I’m not the only one rummaging around in my refrigerator I prefer to just use plastic (either the plastic storage lids or the Tattler reusable canning lids with a metal band) and not worry about it. Hope this helps.
@Angi Schneider, Just a quick hint — I’ve discovered that the lids from mayo jars and the smaller peanut butter jars work perfectly for covering (regular mouth) jars of pickled veggies and fermented veggies in the frig. No “rust”. This has been really helpful to me — always save those plastic lids.
Thanks for the tip!
I’m a successful home sauerkraut fermenter; that being said, I should have luck following the same basic recipe & process for peppers, right?
Pretty much. You’ll need to add water to the pepper which you don’t have to add to most cabbage for sauerkraut though.
What can I use to measure the salt. I’m gram ignorant!! Lol
I use a digital kitchen scale. I’m gram ignorant too!
My granddaughter wants to learn to fernent . This is something I have never done therefore I need advice. Could you go thru the process for us please
The process is truly simple, put the peppers and salt water in a sterile glass jar. Add a weight and a airlock system and you’re good to go. I bet your granddaughter would enjoy Fermented Vegetables by Christopher and Kristen Shokey. Her library probably has it or can get it for her. It will walk her step by step through the process of fermenting various vegetables.
Hi – once you get that all set up you state ‘check every day or so’ what do you check? Do you need to take the lids off and let air escape then screw the lid back on tight? How do you know when its ‘done’? Thanks
You’re checking to make sure the solids remain under the brine. Also, after about day 5, you can open them up and taste them. If they’re salty, they need more fermenting time. When you like the flavor, that’s when to put a regular lid on them and store them in the refrigerator.
This may be a ridiculous question, but as I check the peppers every day, what am I checking for…?
Not a ridiculous question at all. The first few days you’ll see bubbles in the jar which is good and the brine will begin to cloud which is also good. Some of the brine might bubble up out of the jar and that’s fine, just clean it up. If it gets into the airlock, I wash and refill the airlock with clean water and put it back on. After a few days open the jar up and taste a pepper. If it tastes salty, put the weight and lid back on and let it ferment more. If it tastes sour, you can let it ferment a little more or if you like the flavor, they’re done. Hope this helps.
Hi! Thanks for this clear, easy recipe! One question: Where do you get non-chlorinated water? Seems like most municipal water systems add chlorine. I have an under-sink filter that removes most of the chlorine *taste*, but I can’t be certain there’s not still chlorine in there. Do you use bottled spring water?
Yes, you can use bottled water. But honestly, if you have a lot of peppers, you might try a small batch with your filtered tap water and see what happens. You can also dechlorinate the water. Here are some instructions, https://www.masontops.com/blogs/masontops-blog/how-to-make-chlorine-free-water. Hope this helps!
Thank you!
What do you use for a weight?
I use glass weights, here’s a link to my favorite ones, but you can other things. Some people will fill a ziplock bag with water and use that to make sure everything is under the brine.
You don’t say what to do with the garlic in your instructions
It get’s peeled and put into the jar if you want garlic in your peppers. I’ve corrected the recipe. Thanks for catching that!
Do you need fermentation lids? When I make sauerkraut, I use a crock and a bag filled with water for the weight and the crock lid. Want to try peppers and want to know if I can do them the same way without the lids
Hey Bud, yes, you can ferment without a fermentation lid. I recommend the lids for those who are new to fermenting as it takes away some of the user error issues. The only difference between fermenting sauerkraut and fermenting peppers is that you’re going to make saltwater brine.
Hi. Thanks for the post! I noticed you keep the seeds in the pepper. Can you make it either way? What is the difference in keeping seeds in or not? Also, can banana peppers be done whole?
Take care
Misha
Yes, the seeds can be removed. It’s really just a personal preference whether to remove the seeds or not. Some believe that by removing the seeds it makes the peppers less spicy, but it’s really the membrane that that holds the seeds that has the capsicum in it. When you remove the seeds, you also remove some of the membrane therefore removing some of the spice. Banana peppers can be fermented whole but I would put a slit in them to allow the brine to get into the pepper and fill the airspace.
My garlic cloves look moldy….
What did I do wrong??
If it’s only the garlic, then it’s probably the anthocyanins (water soluble pigments) in the garlic turning blue. I’ve had that happen a few times and it’s perfectly safe. Usually, but not always, the blue fades as they sit in cold storage.
This looks so good! What a great way to get some more fermented foods in your diet and preserve your garden peppers!
Thanks for sharing! Do they keep long?
A year or so in the refrigerator.
Thank you for the nice article! Funny — just like you said, I started with plain sauerkraut, started adding spices, and now I’m looking forward to trying all sorts of veggies. Hot peppers sound great. Cheers!
It looks like you never use a water bath to finish your fermented vegetables. Aren’t you afraid of bacteria?
There are good and bad bacteria, when done properly fermented vegetables are full of good bacteria. That bacteria would be destroyed if finished by canning. Instead I store my fermented vegetables in the refrigerator. As long as the vegetables stay under the brine, there is no risk of mold or bad bacteria growing. The environment of the brine is very acidic and botulism cannot grow in an acidic environment. Fermentation is one of the oldest forms of preserving food, along with dehydrating, and has been safely done for thousands of years before canning was invented.
I really want to learn how to ferment foods (vegetables) for the gut health benefits. I have high blood pressure so I try to be careful of my salt intake. Is there a fermentation process that is low sodium? Can it be done without salt?
There are lots of different ferments and some do not use salt. You might find this article from Joybilee Farms helpful.