If you’re looking for authentic, southern fig preserves, this is the recipe you need. This spiced up version of the traditional preserved fig recipe turns fresh figs into a super flavorful treat that can be enjoyed all year long. I’ve included safe canning instructions but you can also make this recipe in a small batch and store in the refrigerator. So many options!

This recipe was reviewed for accuracy and food safety by Angi Schneider in April 2026. All processing times and methods follow tested guidelines from the USDA and the National Center for Home Food Preservation (NCHFP).
What are fig preserves?
Unlike jam or jelly, whole fig preserves keep the figs whole. That being said, you can cut large figs in half. But the idea of preserves is that you have large pieces of fruit in them and not mashes fruit.
Fig preserves are a combination of whole figs, simple syrup, and lemon juice. This traditional fig preserve recipe is a little more involved than other fruit preserves but it’s worth it. I’ve seen other fig preserve recipes that are quicker but I cannot find any tested recipes from the National Center for Home Food Preservation, The University of Georgia or any other reputable organization that has tested those recipes.
Ingredients
Figs are not as acidic as most fruits which means that they are little tricky to safely can. They fall right on the line between low acid and high acid foods which is 4.6 on the pH scale. Because of that its important to use tested recipes and processes to make sure your fig preserves are acidic enough for water bath canning. Sugar adds to the acidity of the preserves so, if you want to adjust the amount of sugar, you’ll need to store your fig preserves in the refrigerator.
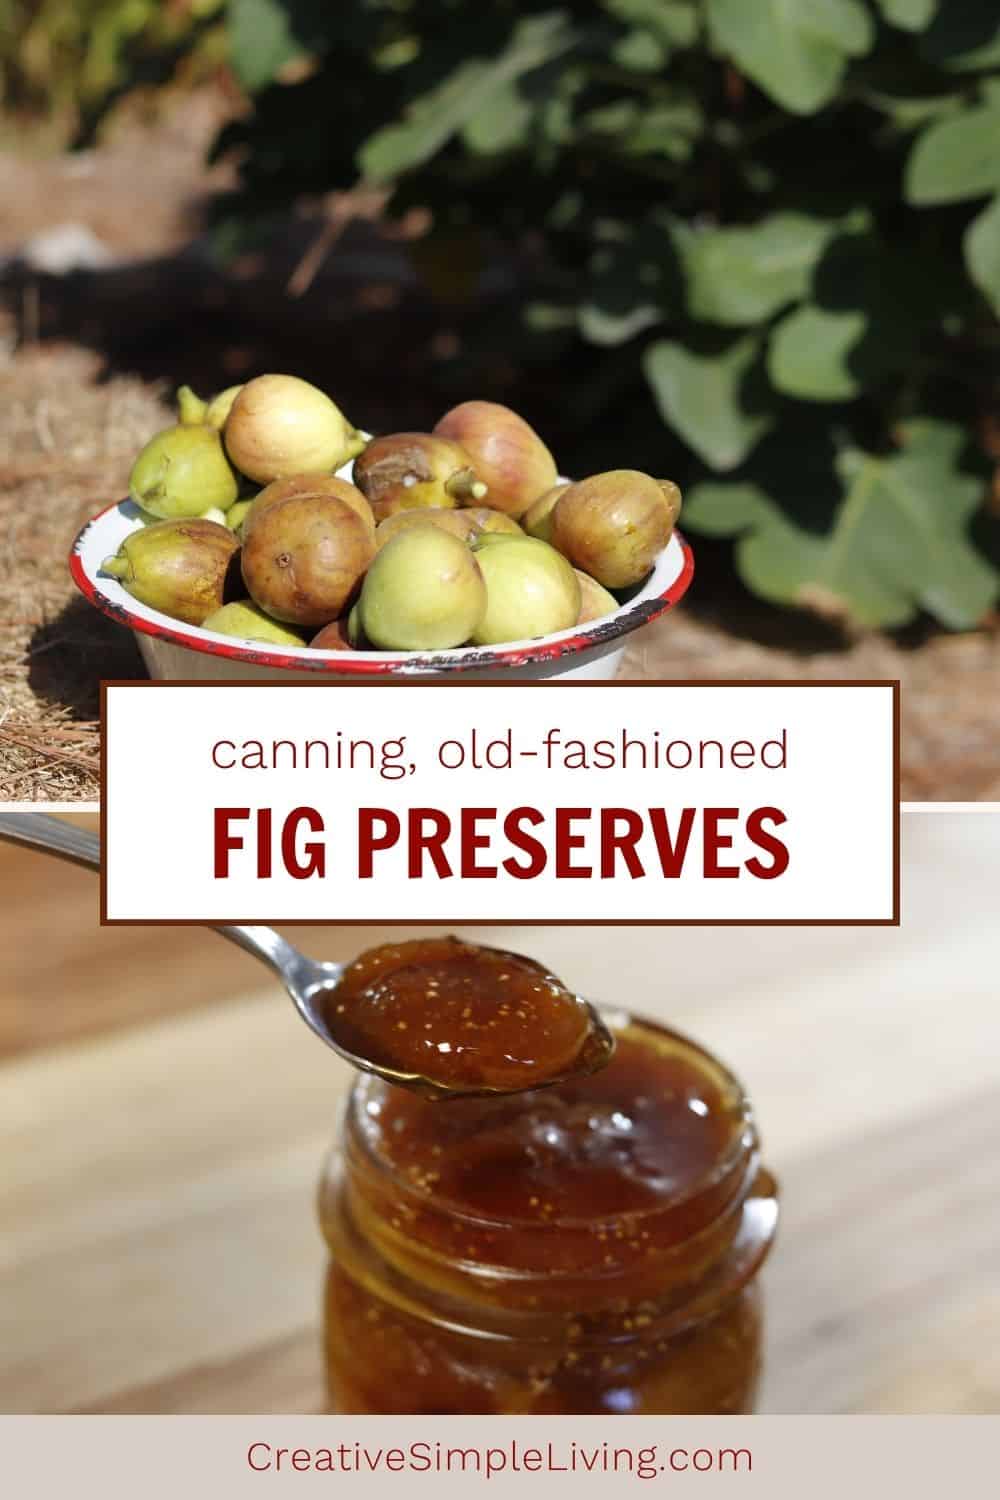
Figs – Any fig variety is good for this recipe. The best place to get ripe figs for preserving is from your own fig tree or a neighbor’s fig tree. Figs don’t ship well and are very expensive in the grocery stores. Fortunately, figs will grow in a variety of climates and are very fast producers so you can probably find someone who is growing figs in your area. We have brown turkey figs and kadota figs. If you use black mission figs, the color will be a little different than mine.
Sugar – Any brand of granulated sugar will work. I prefer to use pure cane sugar. The sugar in this recipe cannot be reduced and still be canned. If you want to use less sugar, you’ll need to store your fig preserves in the refrigerator.
Lemons – Fresh lemon slices are boiled with the simple syrup to add some flavor to the fig preserves. According to the So Easy to Preserve book published by the University of Georgia, these are optional. So, you can use them or not. I think they enhance the flavor of the figs, so I always use them.
Spices – Dried spices can be added to canned goods without compromising the safety. I like to add a cinnamon stick and a couple of whole cloves to the simple syrup and then remove them before canning. You can also add a bit of vanilla extract or balsamic vinegar without compromising the safety.

Preparing Fig Preserves
Fig preserves take time, but most of is is hand’s off. You can start in the morning and do it all in one day or break it up over two days.
- Pick or Buy Figs – Figs don’t have a very long storage life, so plan on processing them as soon as you can after they’ve been picked.
- Wash figs to remove any dirt or debris.
- Boil water and then pour boiling water over figs. Let the figs soak for 15 minutes and then drain the water. This softens the skins.
- Rinse figs in cold water.
- In a medium stockpot, combine water, sugar, lemon slices and spices.
- Bring to a boil and boil 10 minutes.
- Skim any foam off the syrup and remove lemons slices and whole spices.
- Carefully put whole figs a few at a time into the the boiling syrup until all have been added.
- Cook until figs are translucent.
- Remove the figs with slotted spoon and put them in a shallow baking dish.
- Boil syrup until it’s a honey-like texture.
- Carefully pour the boiled syrup over figs and let cool.
- Put the fig mixture in the refrigerator and let stand for 6-8 hours.
Canning Fig Preserves
After the preserves have been in the refrigerator for 6-8 hours they are ready to be reheated and canned. You can also skip this canning process and transfer the fig preserves into airtight containers and store in the refrigerator. They will last 3-4 weeks in the refrigerator.
- Wash canning jars, lids and bands in hot soapy water. Check jars for nicks or cracks.
- Rinse water bath canner and then fill it two-thirds of the way with water.
- Put the clean jars in the canner.
- Put the canner on the stove and bring to a boil. Boil jars for 10 minutes. Because fig preserves are processed for only 5 minutes, the jars need to be sterilized first.
- Transfer the figs and syrup from the shallow pan to a large saucepan.
- Bring figs and syrup to a boil. Be sure to store often so it heat evenly and doesn’t scorch.
- Using a jar lifter, remove sterilized jars from canner.
- Fill with whole figs and syrup, leaving 1/4-inch headspace. Try to evenly distribute figs into the jars.
- Wipe rims of jars with a clean, damp cloth.
- Put lids and bands on the jars and put the jars back into the water bath canner.
- Bring canner to a boil and process for 5 minutes (adjusting for altitude, if necessary)
- Turn off the heat and allow jars to sit in canner for 5 minutes.
- Remove jars from canner and put on a towel on the counter.
- Let the jars cool for 12-24 hours.
- Check the seals. If any jars didn’t seal, put them in the refrigerator to use first.
- Remover rings, wipe jars with a clean, damp cloth.
- Label jars and store in a cool place. Homemade fig preserves have a shelf life of 1 year. After about a year, the quality will start to deteriorate, however, as long as the jars are sealed, they are safe to eat.
| Style of Pack | Jar Size | Elevation (feet) | Processing Time (minutes, boiling-water canner) |
|---|---|---|---|
| Hot pack | Half-Pints & Pints | 0 – 1,000 ft | 5 minutes |
| Hot pack | Half-Pints & Pings | 1,001 – 6,000 ft | 10 minutes |
| Hot pack | Half-Pints & Pints | Above 6,000 ft | 15 minutes |

Ingredients
Equipment
Method
- Wash figs to remove any dirt or debris. Put figs in a heat safe bowl or pan.
- Boil 6 cups water and then pour boiling water over figs. Let the figs soak for 15 minutes and then drain the water.
- Rinse the figs in cold water.
- In a medium stockpot, combine 3 cups water, 2 cups sugar, lemon slices and spices, if using
- Bring to a boil and boil 10 minutes.
- Skim any foam off the syrup and remove lemons slices and whole spices.
- Carefully put whole figs a few at a time into the the boiling syrup until all have been added.
- Cook until the figs are translucent.
- Remove the figs with slotted spoon and put them in a shallow baking dish.
- Boil syrup until it's a tick, honey-like texture.
- Carefully pour the boiled syrup over figs and let cool.
- Put the fig mixture in the refrigerator and let stand for 6-8 hours, before canning.
- Wash canning pot and fill halfway with water. Put the pot on the stove and heat over medium heat.
- Wash jars and look for any nicks or cracks. Put the washed jars in the canning pot and bring to a boil. Boil for 10 minutes to sterilize the jars since the processing time is only 5 minutes.
- Wash lids and rings, and set aside. Manufacturers no longer recommend boiling lids, so just set them aside.
- Transfer the figs mixture from the shallow pan to a large saucepan.
- Bring figs and syrup to a boil. Be sure to store often so it heat evenly and doesn't scorch.
- Using a jar lifter, remove sterilized jars from canner.
- Fill the hot jars with whole figs and syrup, leaving 1/4-inch headspace. Try to evenly distribute figs into the jars.
- Wipe jar rims with a clean, damp cloth.
- Add lids and rings. Tighten just fingertip tight – do not crank the lid down.
- Put the filled jars back into the canner and make sure the water level is 1 to 2 inches above the lids. Add more hot water, if necessary.
- Bring water to a boil and process jars for 5 minutes, adjust for altitude if necessary (see notes below)
- After processing, turn off the heat, and let the jars remain in the canner for 5 minutes.
- Using a jar lifter, remove the jars and put them on a towel on the counter.
- Let the jars cool to at room temperature for 12-24 hours.
- Remove the rings and check the seals. If any jars didn't seal, put them in the refrigerator to use first.
- Wipe the sealed jars with a clean cloth, label and store in cool dark place. Use within a year or so. As long as the jars are sealed they're safe to eat but the quality and crispness will deteriorate over time.
Notes
Tried this recipe?
Let us know how it was!How to use fig preserves
Fig preserves can be used in so many ways. My favorite is to spoon them onto hot biscuits, because who doesn’t love homemade biscuits? Here are some other ideas for using homemade fig preserves…
- Ice cream topping
- Add to morning bowl of oatmeal
- Stir into yogurt
- Sever on a cheese tray or charcuterie boards
- If you want to use it as a fig spread, empty the jar contents into a food processor and chop up the large pieces of figs. Use this to spread on morning toast, to fill thumbprint cookies, or make fig bars.
Making fig preserves isn’t the only tasty way to store figs all year long. Here are some more ideas for preserving figs. If you end up with too many figs to deal with right a way, freezing them is a good option.
Frequently Asked Questions
Fig jam is made from mashed or chopped figs cooked down into a smooth, spreadable consistency. Fig preserves keep the figs as whole or large pieces suspended in a thick syrup — so you get chunks of actual fruit in every jar. If you love biting into a whole fig on a biscuit, preserves are the way to go.
No — this recipe uses no pectin at all. Figs have enough natural pectin that the syrup thickens on its own when cooked down properly. The long resting time in the refrigerator also helps the figs absorb the syrup and develop that rich, jammy texture.
Figs are a borderline low-acid fruit, sitting right at the 4.6 pH line that separates high-acid and low-acid foods. That means they need added acidity to be safely water bath canned. Lemon juice or lemon slices bring the pH down to a safe level. Do not skip this step if you’re canning — if you want to skip the lemon, store the preserves in the refrigerator instead.
Not if you’re planning to can them. The sugar in this recipe is part of the food safety balance — it contributes to the acidity and acts as a preservative. If you want less sugar, make a small batch and store it in the refrigerator for up to 3–4 weeks instead.
Properly canned fig preserves stored in a cool, dark place will keep for about a year. After that the quality and texture start to decline, though sealed jars remain safe to eat. Once opened, store in the refrigerator and use within a few weeks.
Any variety works — brown turkey, kadota, black mission, or whatever you have access to. The color of the finished preserves will vary depending on the fig variety. Brown turkey and kadota figs give you a golden, amber preserve. Black mission figs will produce a darker, richer colored preserve.
Yes, though the texture will be softer than fresh figs. Thaw them completely and drain any excess liquid before using. Fresh figs will always give you the best whole-fig texture, but frozen figs work well if fresh aren’t available.
Because the processing time for this recipe is only 5 minutes, which isn’t long enough to sterilize the jars during processing. Any recipe with a processing time under 10 minutes requires pre-sterilized jars — it’s an important food safety step, not an optional one.

Angi Schneider is the author of The Ultimate Guide to Preserving Vegetables and Pressure Canning for Beginners and Beyond, both published by Page Street Publishing. She has taught canning classes for 177 Milk Street, been featured in Serious Eats, and written for Countryside Magazine. Angi has been sharing gardening, preserving, and simple living skills since 2010.
Where to buy moringa seeds
True Leaf Market is a reputable place to get them.
we love this fig preserves recipe. we make it every year
Do I put my canner top on and let it pressure up when doing these preserves or is this like a hot water bath?
These are done in a water bath canner, not a pressure canner.